InspectForge Documentation
Complete guide to every feature in InspectForge — from onboarding and AI-powered templates to mobile field inspections, digital agreements, and professional report delivery.
Documentation Sections
Getting Started
When you sign up and log in for the first time, InspectForge walks you through a simple 3-step onboarding wizard so you can start inspecting right away.
- • Select your industry type
- • Enter company name, phone & email
- • Enter your business address (street, city, state, zip, country)
- • Upload your company logo (PNG, JPG, GIF, or WEBP)
- • Max 5 MB with live preview
- • Logo appears on all reports and throughout the app
- • Browse pre-built industry-standard templates
- • Select one as your default
- • Create more templates (including AI-generated) later
After onboarding, you land on your personalized Dashboard — ready to add clients, properties, and start inspections.
Dashboard
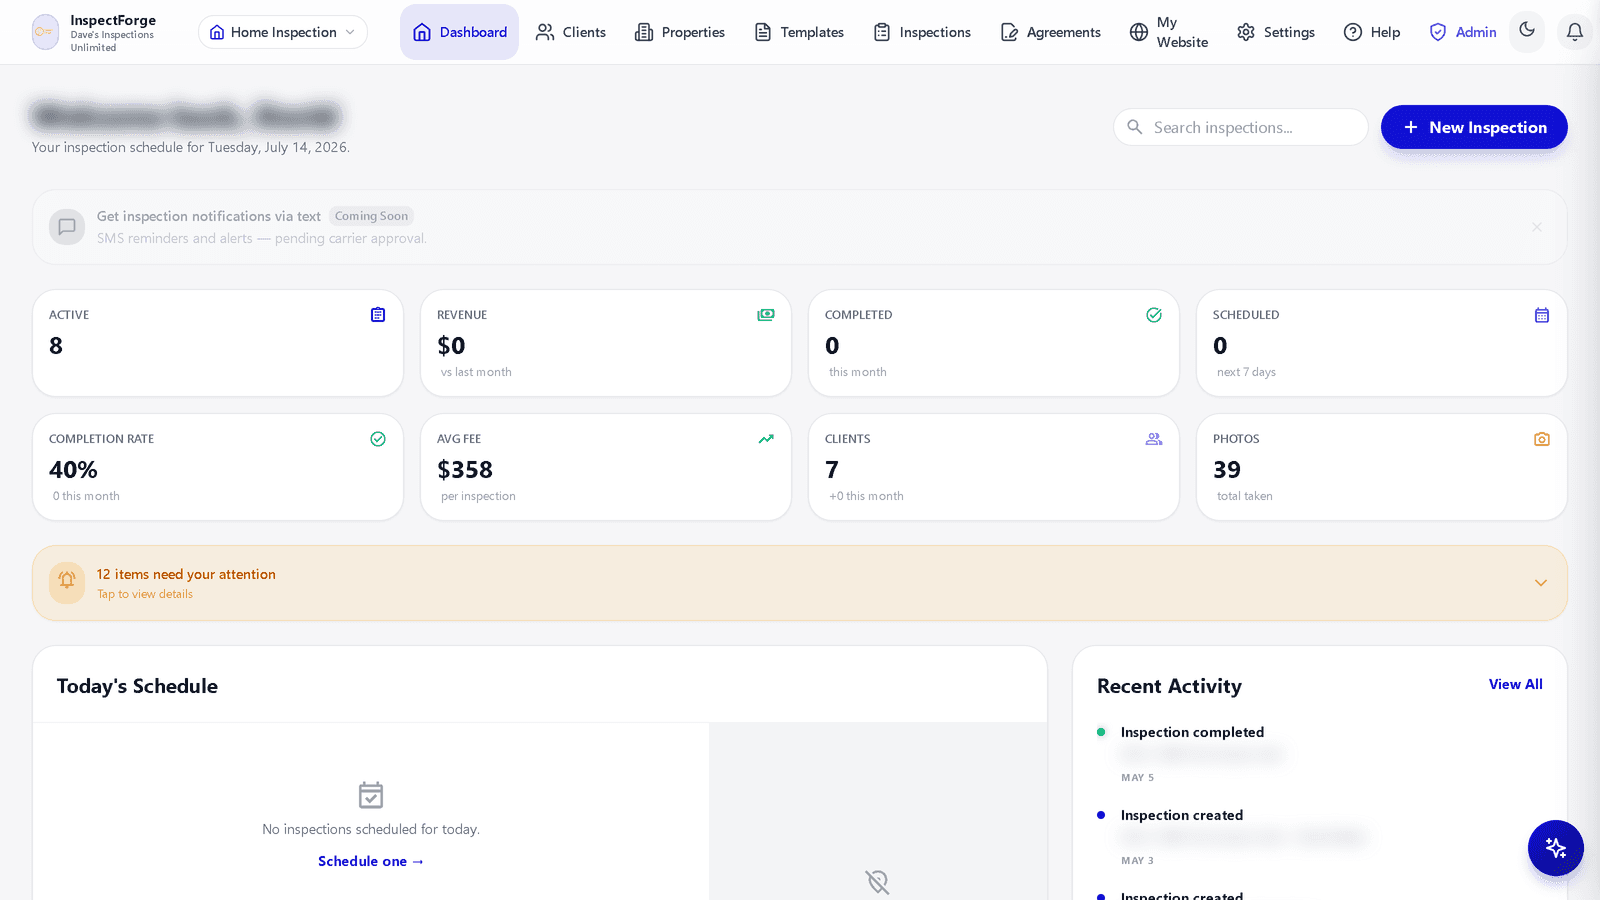
The Dashboard is your command center. It surfaces everything you need at a glance — stats, pipeline status, quick actions, and your inspection calendar.
Business Metric Cards
Eight at-a-glance metric cards across the top:
- • Active inspections
- • Revenue vs. last month
- • Completed this month
- • Scheduled (next 7 days)
- • Completion rate
- • Average fee per inspection
- • Clients gained this month
- • Total photos taken
Quick Access
- • Search inspections right from the dashboard header
- • "+ New Inspection" button always one click away
- • Needs Attention panel — expandable amber banner listing items that need action (unsigned agreements, unpaid invoices, stalled inspections)
- • Recent Activity feed — inspections created, completed, and delivered with dates
Today's Schedule
Your day's inspections front and center:
- • Today's appointments with times and addresses
- • Map preview of your scheduled stops
- • "Schedule one" shortcut when the day is open
Inspection Lifecycle
Inspections move through 5 stages, tracked throughout the app:
- Draft — Not yet scheduled
- Scheduled — Ready to start
- In Progress — Actively working
- Completed — Report ready
- Delivered — Sent to client
Clients
Full client management built right in. Add clients manually, or import them in bulk from HomeGauge, Spectora, or your own Excel spreadsheet. Link clients to properties and inspections throughout the platform.
Client List
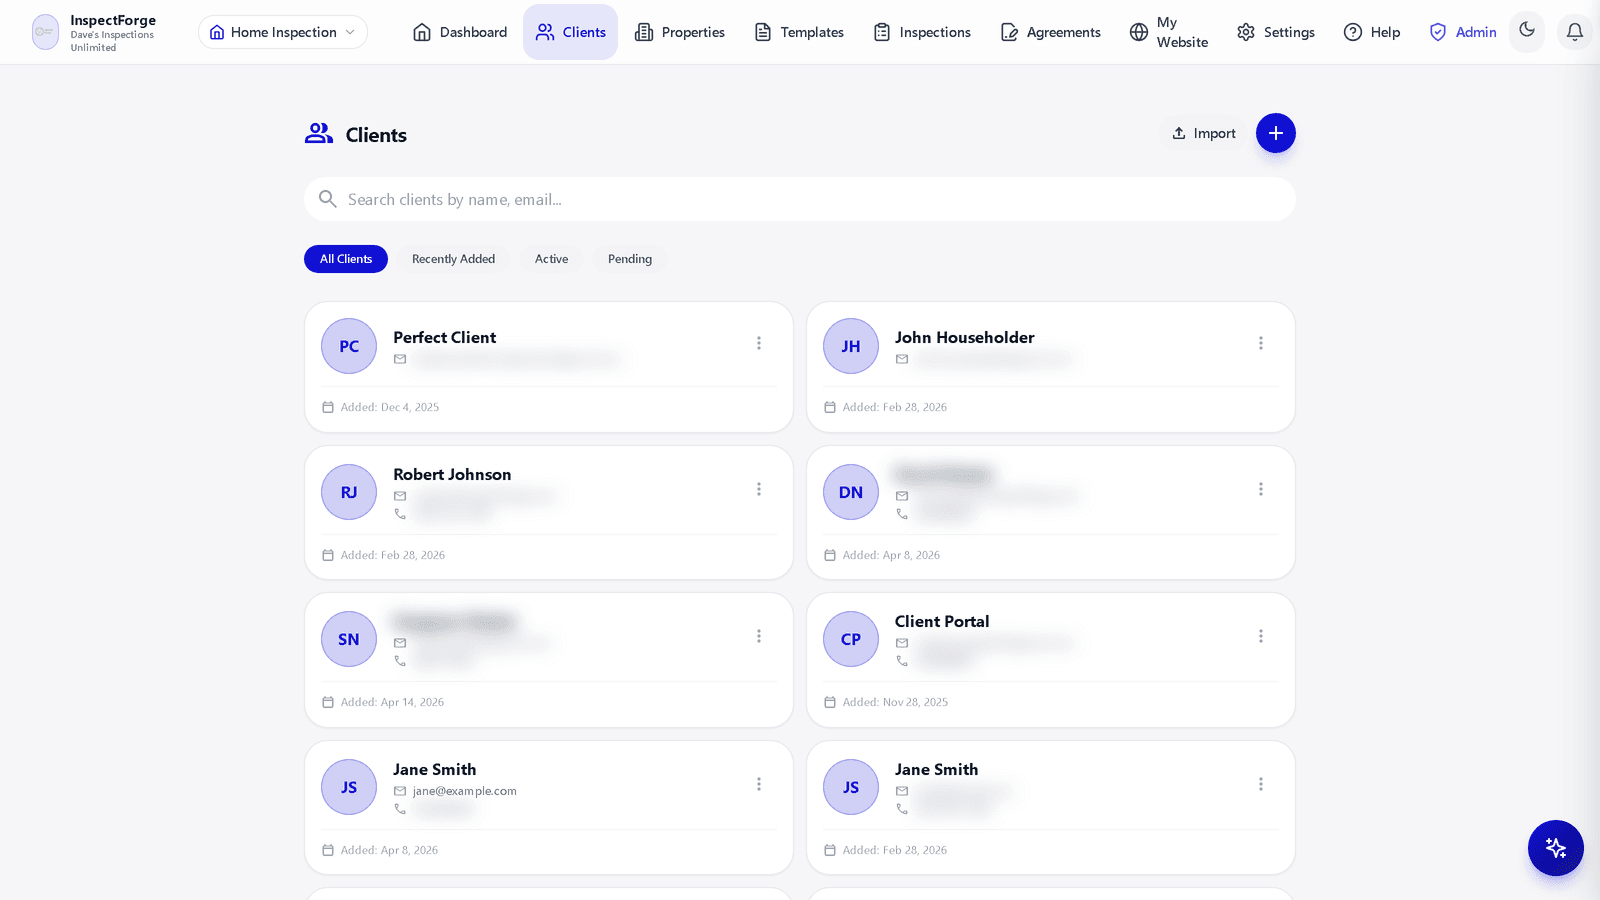
- • Client cards with avatar, contact info, and date added
- • Filter chips: All Clients, Recently Added, Active, Pending
- • Real-time search by name or email
- • Three-dot menu per card: edit client details or delete with confirmation
Add a New Client
- • Full Name (first + last)
- • Email address
- • Phone number
- • Notes
- • Clients are automatically available when creating inspections
Properties
Create and manage detailed property records manually, or import them in bulk along with clients from HomeGauge, Spectora, or Excel. Link properties to clients and use them when scheduling inspections.
Properties List View
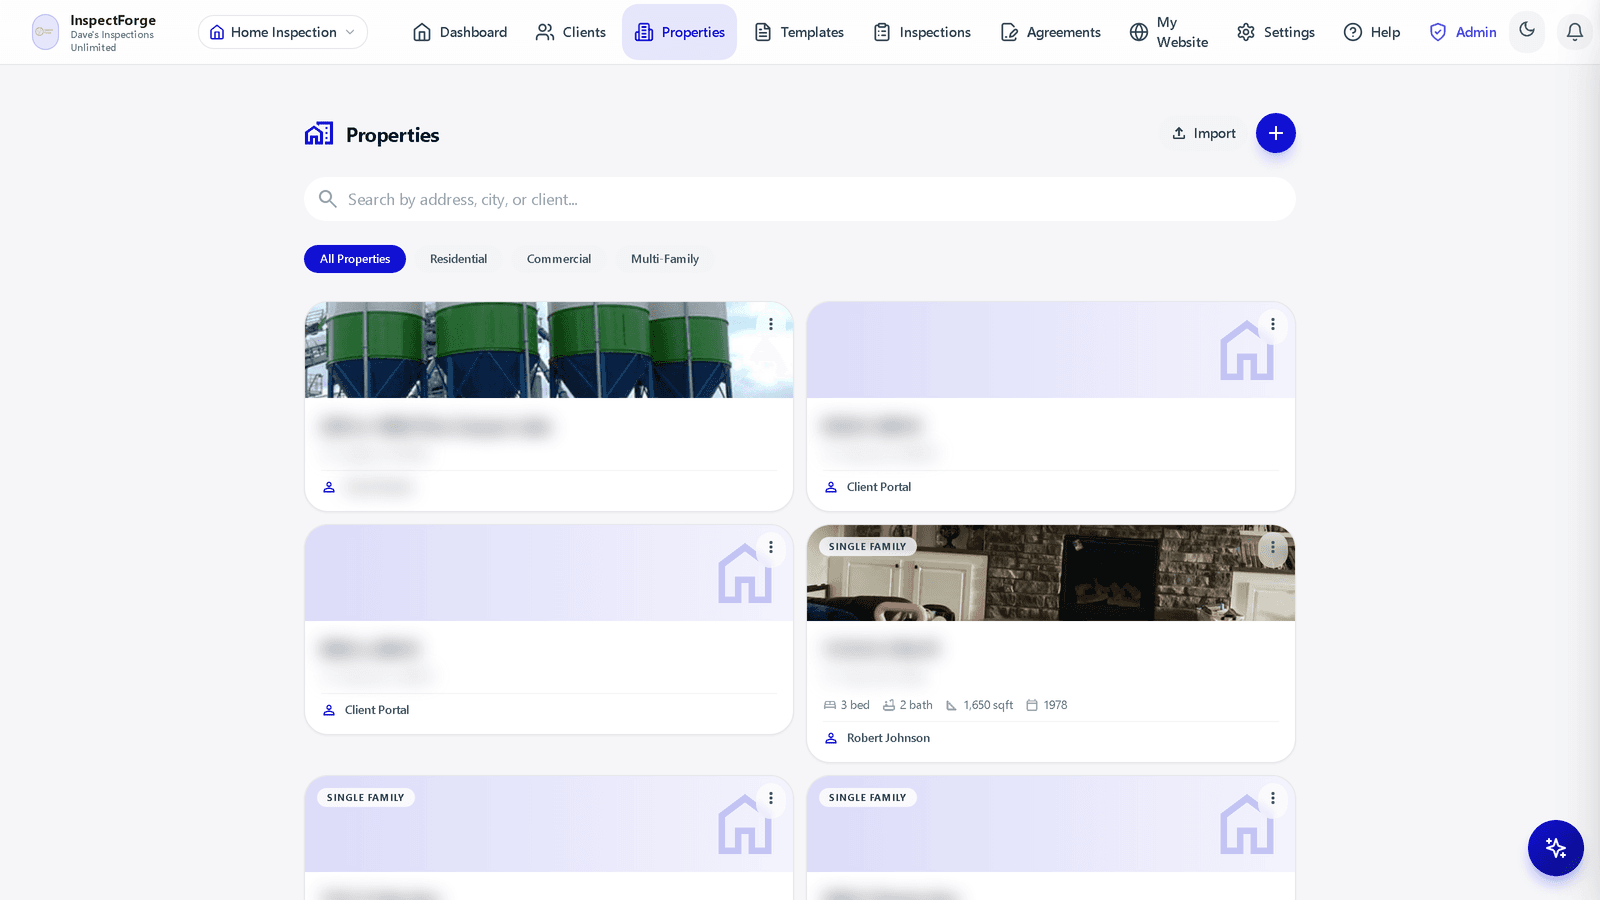
- • Property cards with address, linked client, and type icon
- • Key details: bedrooms, bathrooms, sq ft, year built
- • Search by address, city, or client name
- • Three-dot menu for edit/delete actions
Property Details
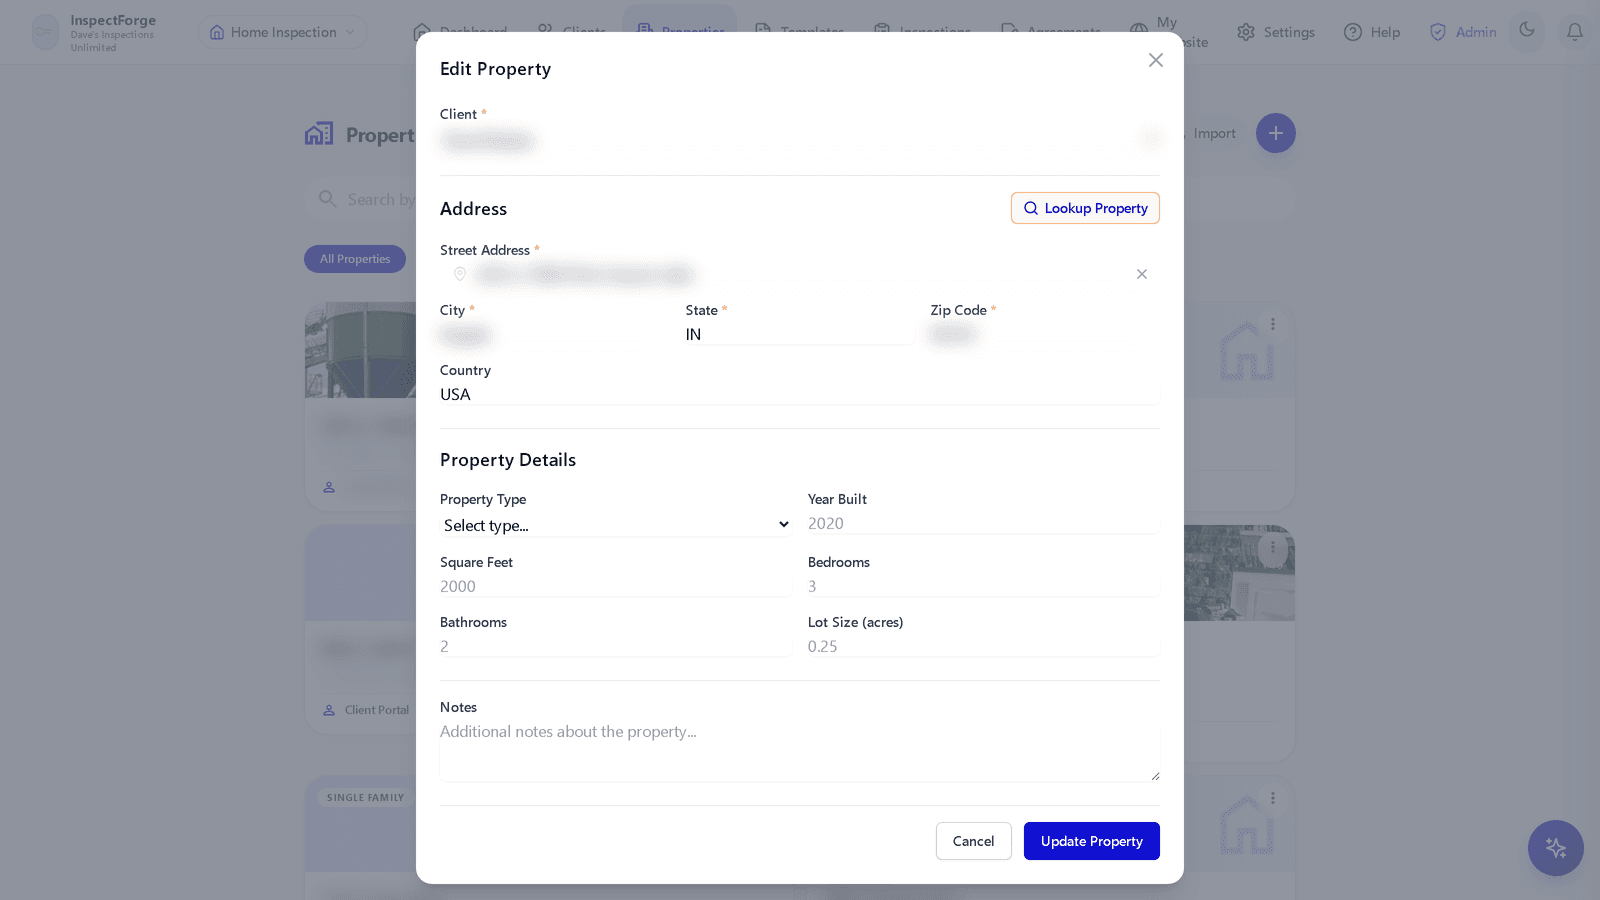
- • Client assignment (link to existing client)
- • Full address: Street, City, State, Zip Code, Country — with address autocomplete and a "Lookup Property" button that auto-fills details
- • Property Type: Commercial, Single Family, Condo/Townhouse, Multi-Family, etc.
- • Year Built, Square Feet, Bedrooms, Bathrooms, Lot Size
- • Notes field for additional context
- • "Enrich from Zillow" action fills in missing details automatically
Import Clients & Properties
Switching from another platform? InspectForge makes it easy to bring all your client and property data with you. Import directly from HomeGauge, Spectora, or use our Excel template for any other source.
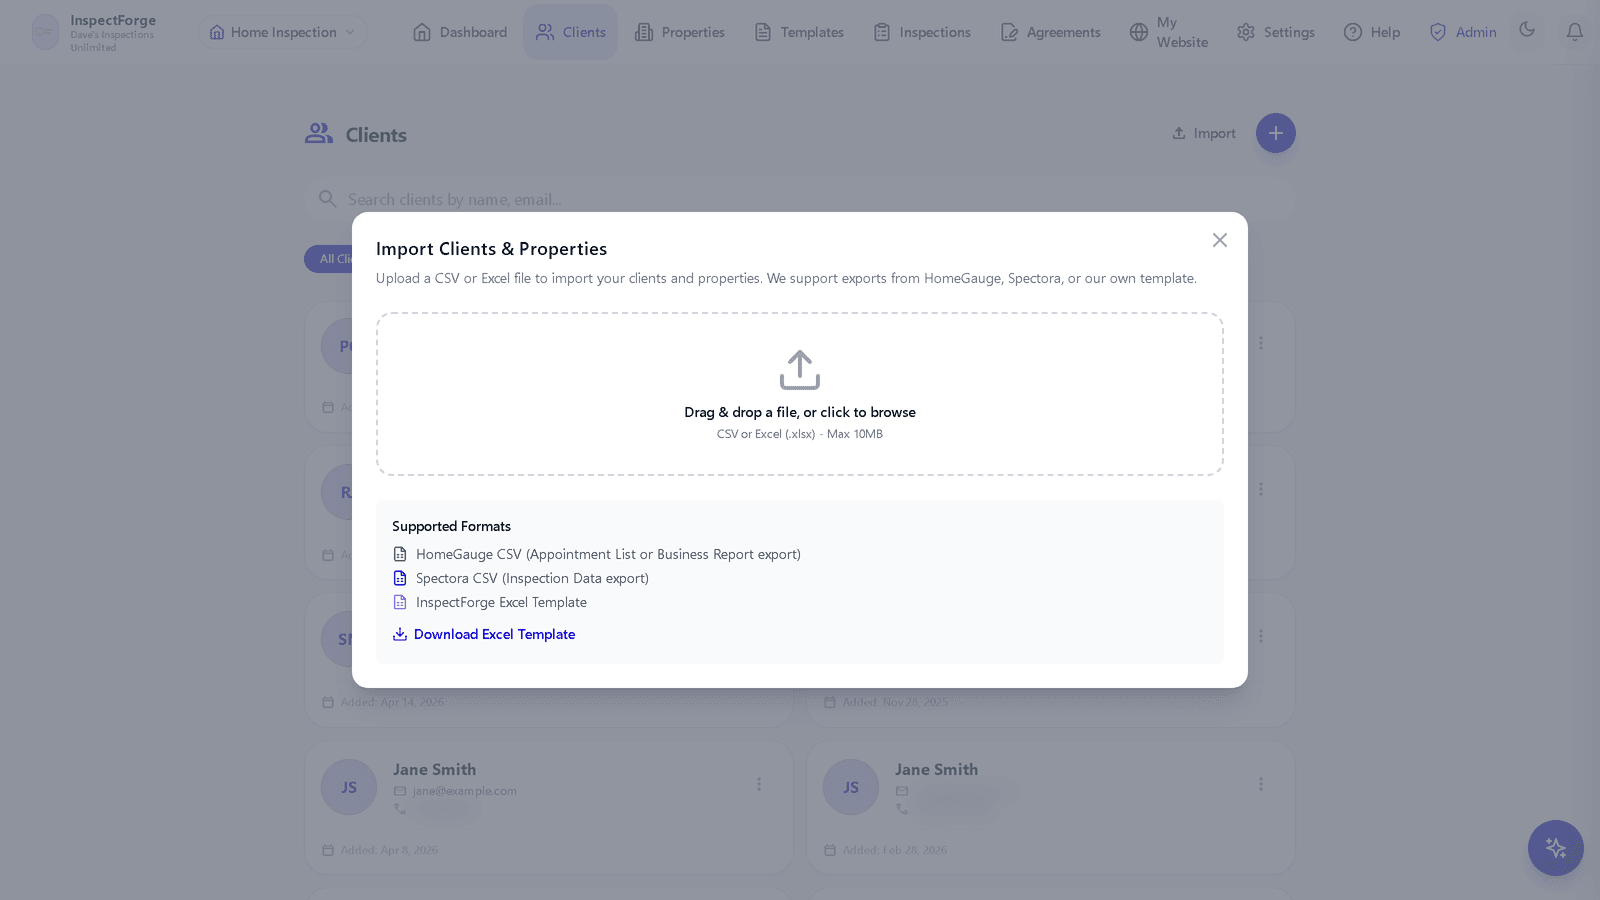
HomeGauge Import
- • Export your Appointment List or Business Report from HomeGauge as CSV
- • Upload the CSV file to InspectForge
- • Clients and properties are automatically mapped and created
Spectora Import
- • Export your Inspection Data from Spectora as CSV
- • Upload the CSV file to InspectForge
- • All client and property records are imported automatically
Excel Template
- • Download the InspectForge Excel template
- • Fill in your client and property data from any source
- • Upload the completed .xlsx file to import everything at once
How It Works
- Navigate to Clients or Properties and click the Import button
- Drag and drop your CSV or Excel file into the upload area (or click to browse) — max 10 MB
- InspectForge detects the format automatically (HomeGauge, Spectora, or InspectForge template)
- Review the import preview and confirm — clients and their linked properties are created together
Inspection Templates & AI Template Generation
Choose from a library of pre-built templates, build your own from scratch, or let MI6 AI generate a complete template from a simple description.
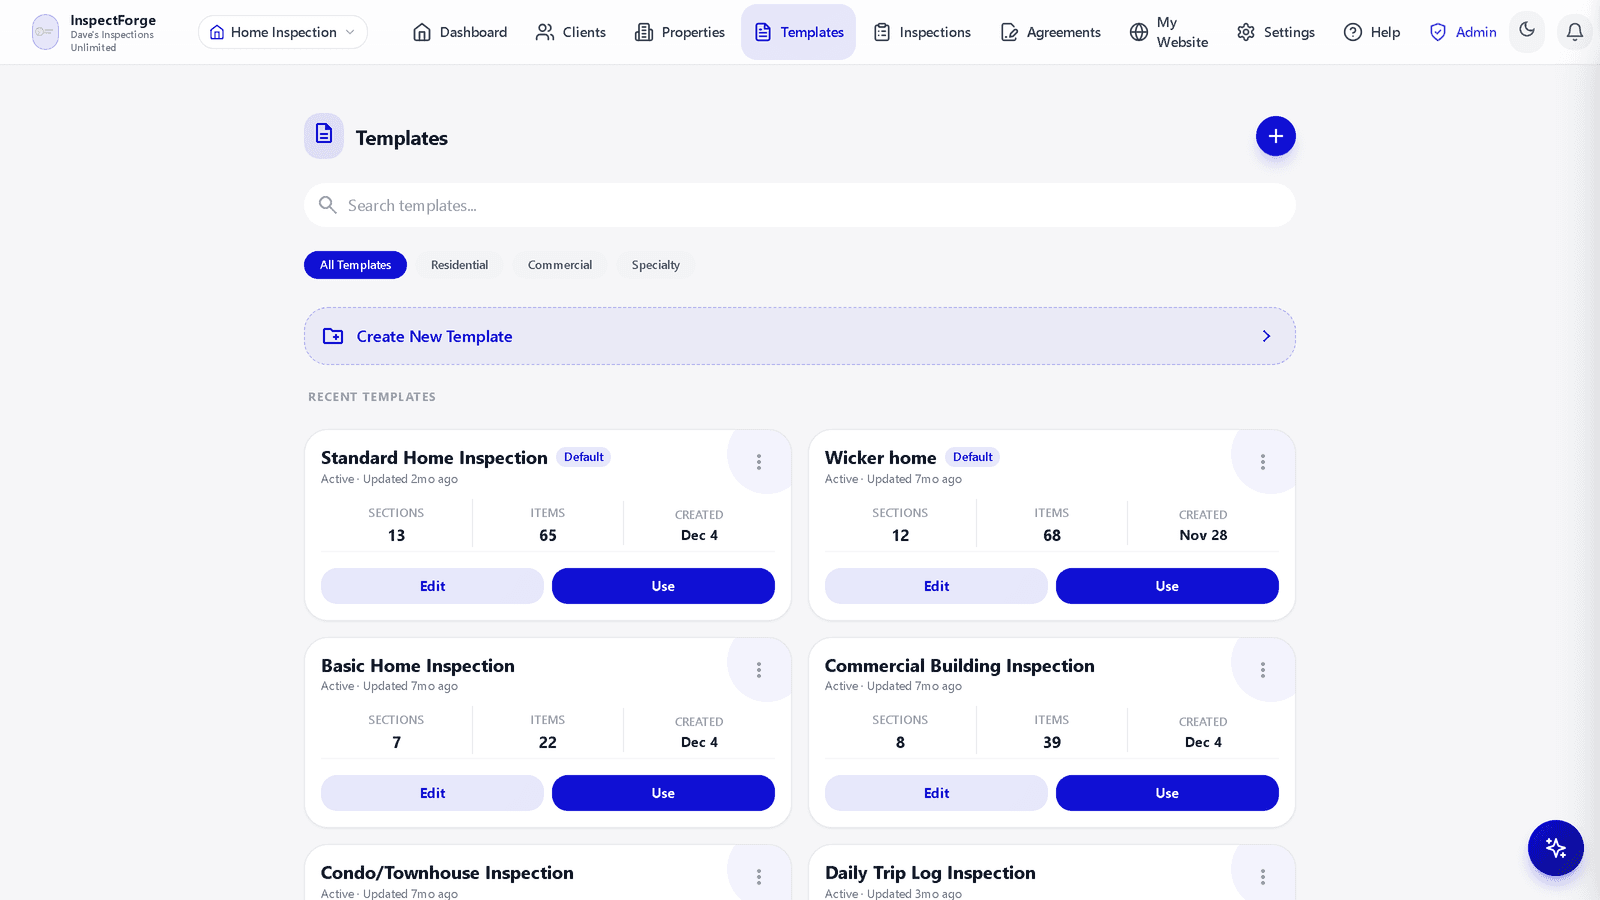
Template Library
- • Search bar to find templates by name
- • Filter chips: All Templates, Residential, Commercial, Specialty
- • Prominent "Create New Template" bar at the top of the list
- • Each card shows: name, "Default" badge, active status, last-updated time, section & item counts, and created date
- • Edit and Use buttons on every card, plus a three-dot menu for duplicate and delete
Pre-Built Templates Include:
• Standard Home Inspection
• Basic Home Inspection
• Aging-in-Place Inspection
• Commercial Accessibility Inspection
• Commercial Building Inspection
• Commercial Fire Door Inspection
• Condo/Townhouse Inspection
• Electrical System Inspection
• And more...
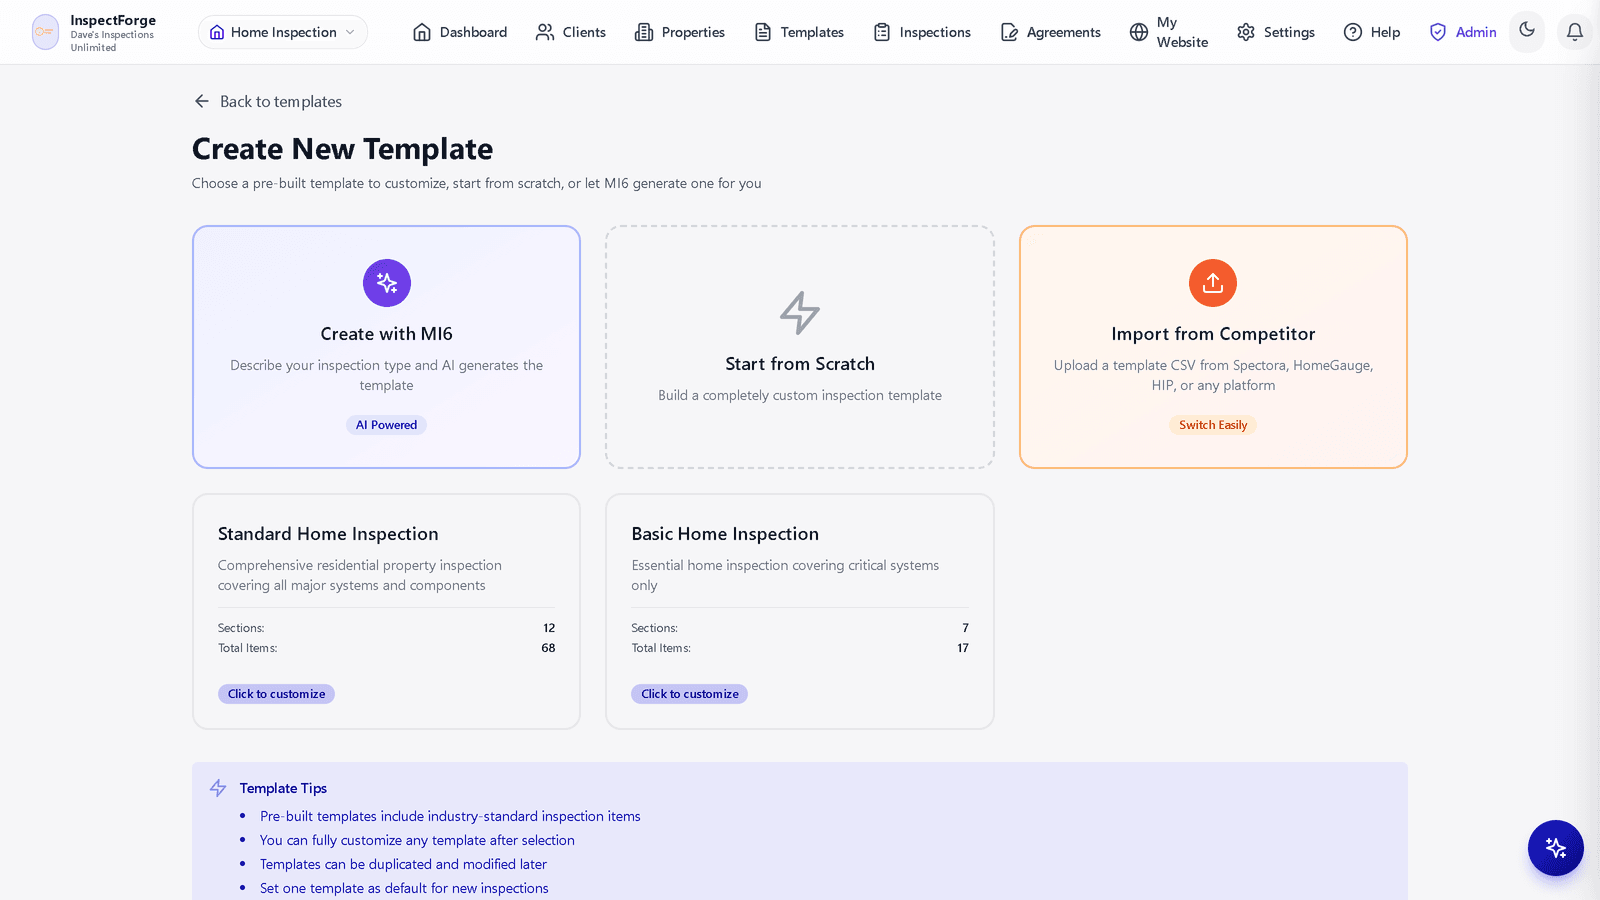
4 Ways to Create a Template
Create with MI6
Describe your inspection type in plain language (e.g., "Restaurant Health Inspection"). MI6 generates a complete template with logically organized sections, items, and pre-configured settings. Preview before accepting, then fully customize.
Start from Scratch
Build a completely custom template manually. Add sections, items, and configure ratings, comments, and photo options per item.
Choose Pre-Built
Select from industry-standard templates and customize them to your needs. Duplicate any template and modify it.
Import from Competitor
Switching platforms? Upload a template CSV from Spectora, HomeGauge, HIP, or any other platform and keep the template you already know.
Template Builder Features
- • Add, remove, and reorder sections via drag-and-drop
- • Add items within each section
- • Per-item configuration: name, description, rating required, comments allowed, photos allowed, display order
- • Set a template as the default for new inspections
- • Mark templates as active or inactive
Inspections — Creating, Performing & Delivering
The core workflow of InspectForge. Inspections move through a clear lifecycle: Draft → Scheduled → In Progress → Completed → Delivered
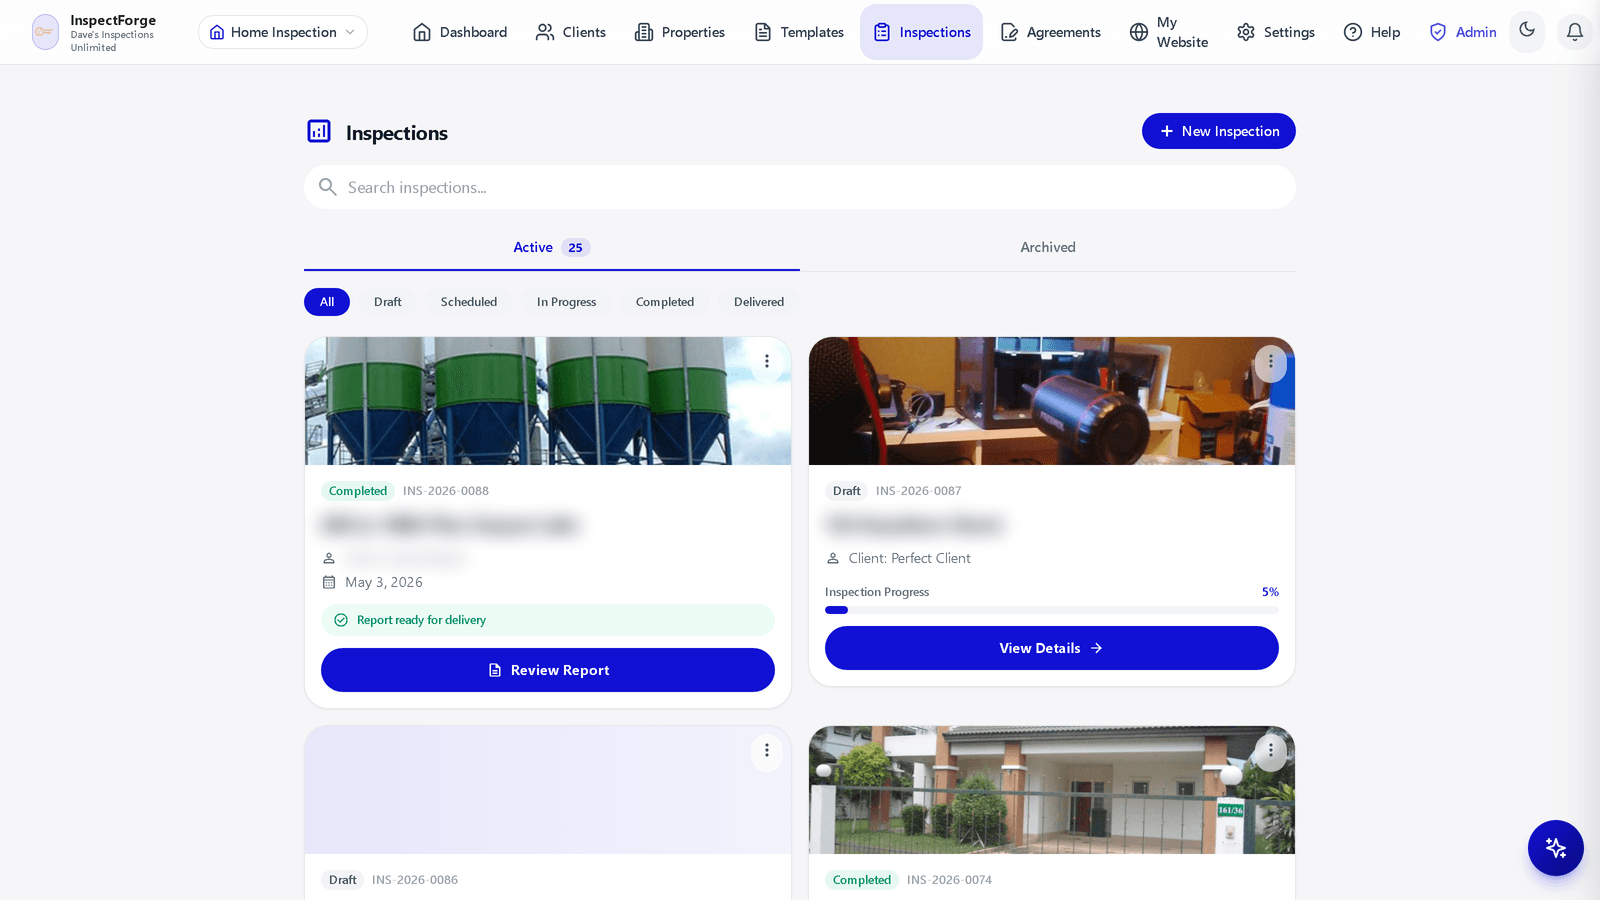
Inspections List
- • Two Tabs: Active Inspections (with count badge) and Archived
- • Search by report number, address, or client name
- • Status Filter Chips: All, Draft, Scheduled, In Progress, Completed, Delivered
- • Photo cards for each inspection showing: property photo, inspection number (e.g., INS-2026-0088), color-coded status badge, address, client, and date
- • In-progress inspections show a live progress bar; completed ones show "Report ready for delivery"
- • Context-aware action button per card: View Details, Continue, or Review Report — plus a three-dot menu for Edit, Resend Report, Archive, and Delete
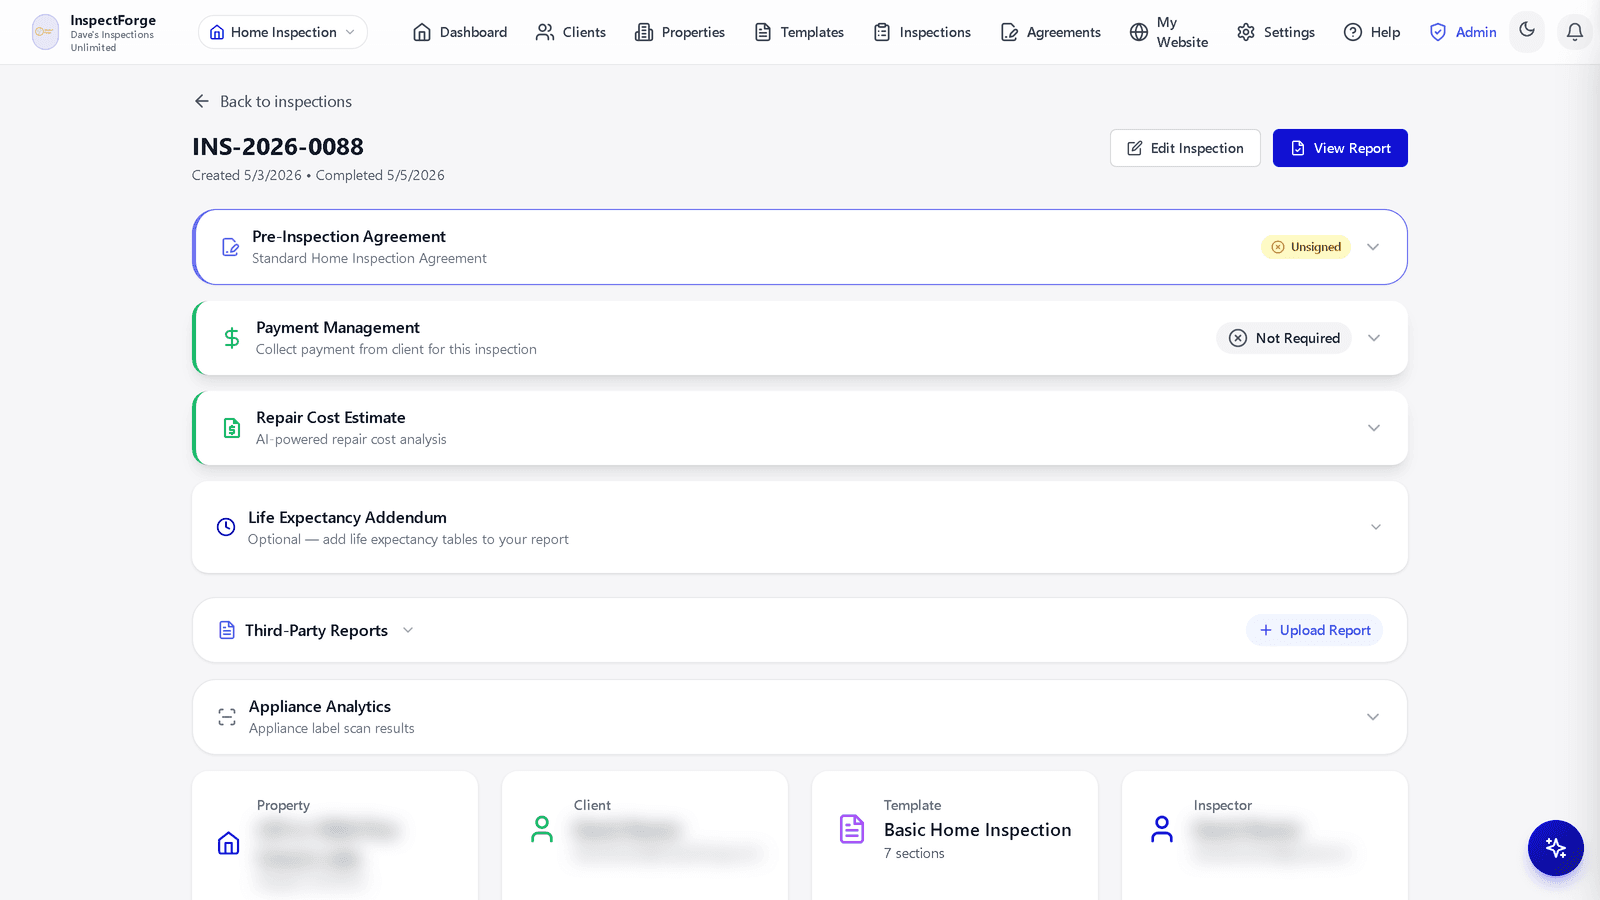
Inspection Detail Page
Every inspection has a command-center page with expandable panels:
- • Pre-Inspection Agreement — signature status at a glance (Unsigned / Signed)
- • Payment Management — collect or record payment for this inspection
- • Repair Cost Estimate — AI-powered repair cost analysis from your findings
- • Life Expectancy Addendum — optional life expectancy tables for the report
- • Third-Party Reports — upload radon, termite, or other outside reports to deliver alongside yours
- • Appliance Analytics — appliance label scan results with age and recall data
- • Property, Client, Template, and Inspector summary cards
Creating a New Inspection
- Click "+ New Inspection"
- Select a template (your default template is pre-selected)
- Choose or create a property
- Choose or create a client
- Set a scheduled date and time
- Optionally attach a pre-inspection agreement
- Save — created in Draft or Scheduled status
Performing an Inspection (On-Site)
The interface is optimized for both desktop and mobile with an item-by-item view for focused fieldwork.
Rating System (4 options per item)
- Satisfactory — Acceptable condition
- Needs Evaluation — Requires professional evaluation
- Defective — Requires repair
- Not Inspected — Could not be inspected
Documentation Fields
- • Comments — Detailed observations
- • Recommendations — Suggested corrective actions
- • Photos — Capture or upload (max 10 MB each)
- • Photo Annotation — Markup tool for drawing, arrows, circles, and text
- • Blue checkmark shows which photos have annotations
AI Features During Inspection
- • Analyze with MI6 — AI analyzes photos and identifies defects with confidence scores
- • MI6 Recommendation Writer — Generates professional recommendation text; accept, append, or regenerate
- • MI6 Chat Bubble — Ask inspection questions at any time
Auto-Save
All data is automatically saved when navigating between items and after photo uploads. A "Saving..." indicator appears during sync. No manual save needed — your work is never lost.
Delivering Reports
- Inspection status changes to Completed
- Click "View Report" to review the full report
- Click "Mark Delivered" to email the report to the client
- Use "Resend to Client" to re-email at any time
- Clients receive a link to view the report online (no login required)
Agreements & E-Signatures
Manage pre-inspection agreements that can be attached to inspections for client sign-off before work begins. Collect electronic signatures via a secure link or upload a pre-signed PDF.
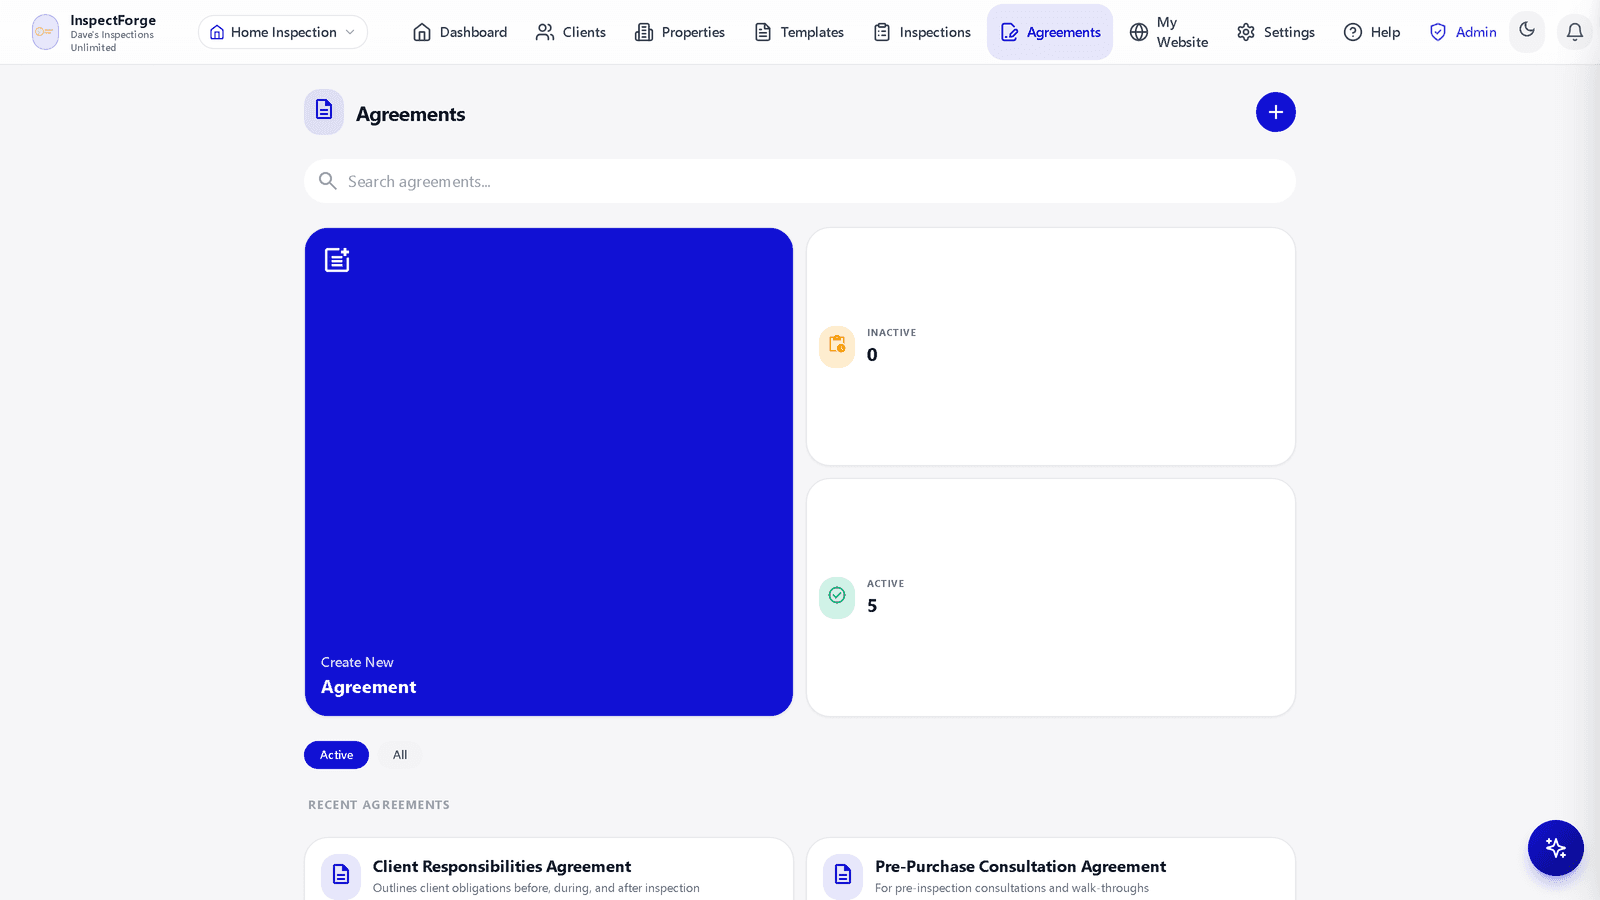
Pre-Built Agreement Types
- • Standard Home Inspection Agreement (Default)
- • Client Responsibilities Agreement
- • Limited Liability Rider
- • Pre-Purchase Consultation Agreement
- • Scope Limitations Agreement
Agreement Features
- • Rich text editor for agreement content
- • Dynamic placeholders:
{Company_Name},{Client_Name},{Property_Address},{Inspection_Date} - • Active/inactive toggle
- • Default agreements auto-selected on new inspections
E-Signature Workflow
- Attach an agreement to an inspection during creation
- On the inspection detail page, click "Get Signing Link" to generate a secure URL
- Share the link with your client (copy to clipboard)
- Client opens the link and signs using a signature pad
- Signed agreement is stored and linked to the inspection
- Status updates from "Awaiting Signature" to "Signed"
Alternatively, upload an already-signed PDF document directly.
Reports
Professional inspection reports are generated automatically from your inspection data. Review, share, print, or email them to clients in seconds.
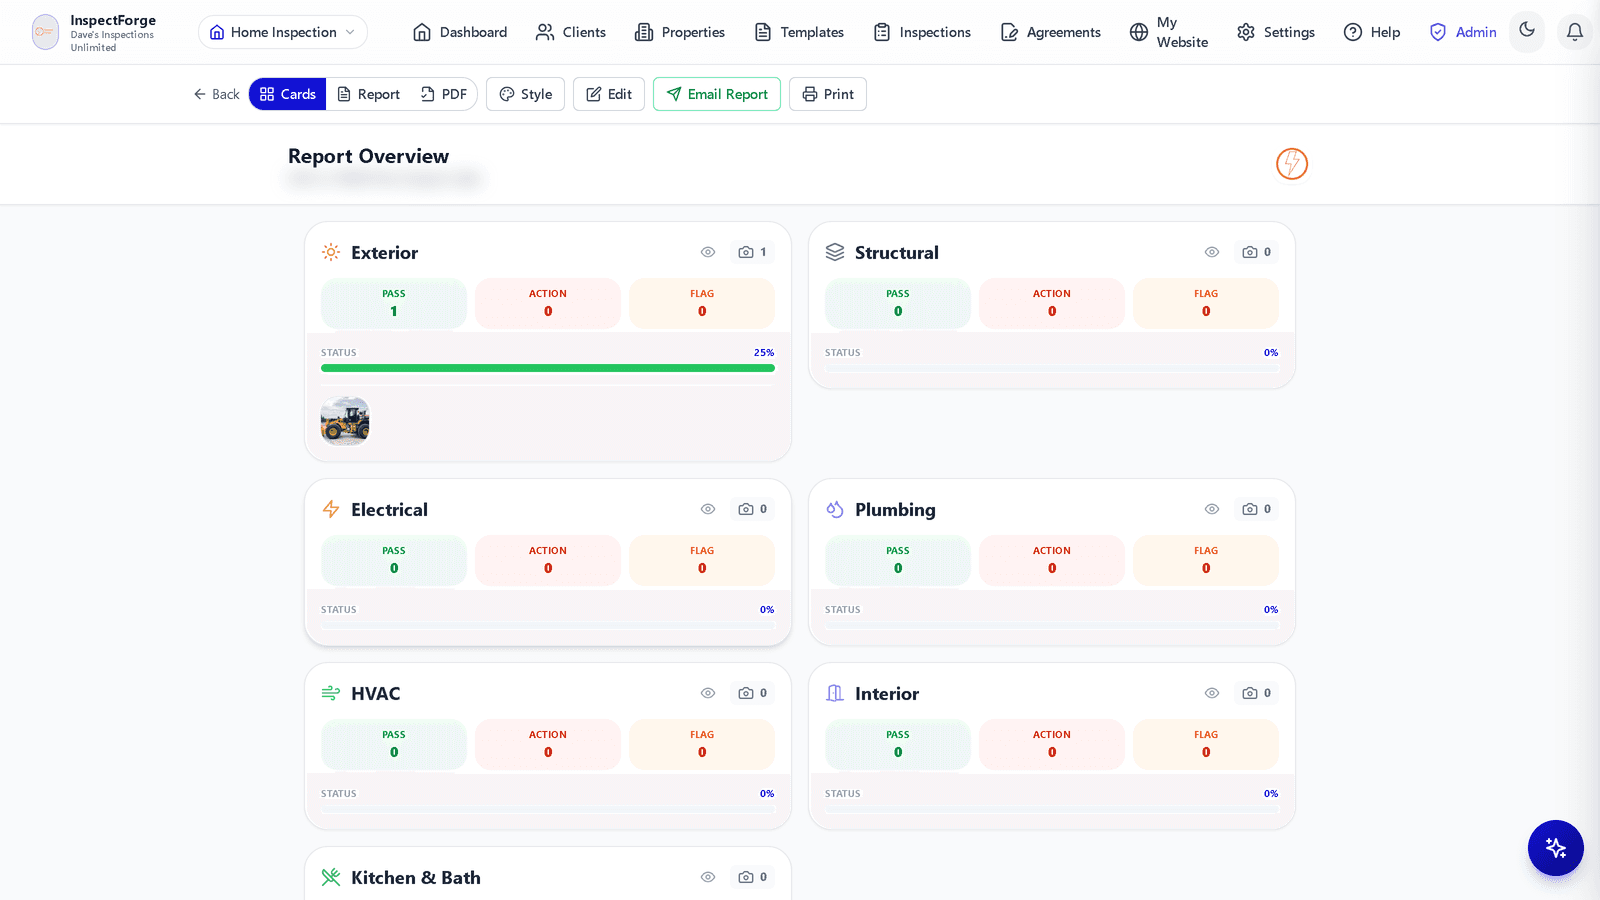
Report Viewer Layout
- • Toolbar: switch between Cards (section-by-section overview) and Report (full document) views — plus PDF, Style, Edit, Email Report, and Print
- • Cards view: every section as a card with Pass / Action / Flag counts, completion bar, and photo thumbnails
- • Report view: the full client-facing report with section navigation and color-coded findings
- • Style: pick a report template/layout before delivering
Report Content
- • Organization logo, branding, and contact info
- • Property & client information
- • Section-by-section findings with status badges, comments, recommendations, and photos
- • Inspector Summary (executive summary section)
AI-Generated Report Summary
Click "Regenerate Summary with MI6" and the AI analyzes ALL inspection findings across every section to generate a professional 3–5 sentence executive summary. Accept or regenerate until you are satisfied. A major time-saver.
Public Share Link
Generate a unique URL for anyone to view the report — no login required.
Email Delivery
Email reports to clients with one click. Resend at any time after delivery.
Print & PDF
Print directly or save as PDF. Print-optimized layout hides navigation and UI elements.
MI6 AI Assistant
MI6 (Master Inspector 6) is InspectForge's built-in AI assistant, integrated throughout the entire application. It helps inspectors work faster, document more thoroughly, and deliver more professional results.
AI Template Generation
Describe your inspection type in plain language. MI6 generates a complete template with organized sections, properly configured items, and professional naming.
Create specialized templates in seconds instead of building manually.
AI Photo Analysis
Click "Analyze with MI6" on any photo. The AI identifies specific defects, potential issues, material conditions, and safety concerns — each with a confidence score.
Catch issues you might miss and speed up documentation.
AI Recommendation Writer
MI6 generates professional 2–3 sentence recommendations based on the item name, rating, and your comments. Accept, append, or regenerate.
Write consistent, professional recommendations without typing from scratch.
AI Report Summary
MI6 reads every section, item, rating, comment, and recommendation to generate a professional 3–5 sentence executive summary.
Polished executive summaries in seconds.
AI Quick Add
Snap a photo on-site. MI6 identifies defects, maps each observation to the correct template section, and lets you apply findings in one click. Zero typing required.
Photo → defect detection → auto-placed in your report.
Video Walkthrough to Findings
Upload a video walkthrough or voice memo. MI6 transcribes the audio with timestamps, extracts individual findings with section and severity mapping, and lets you review and apply selected findings to your inspection.
Supports MP4, MOV, M4A, MP3, WAV (up to 25 MB).
AI Appliance Analytics
Photograph any appliance — water heater, HVAC, electrical panel, furnace. MI6 identifies make, model, estimated age, remaining useful life, condition, maintenance needs, and checks for active manufacturer recall alerts.
Recall alerts and life expectancy from a single photo.
AI Chat Assistant — Available on Every Page
The floating MI6 chat bubble appears in the bottom-right corner of every page. Ask about:
• Home inspection best practices and standards
• Building codes and local regulations
• Report writing tips and professional terminology
• Safety considerations and recommended actions
• Any general inspection question
MI6 provides general guidance. Always verify with local codes and standards.
Scheduling & Calendar
A built-in calendar for managing inspection appointments with conflict detection, business hours integration, and multi-inspector filtering.
Available on Pro and Business plans.
Calendar Views
- • Day View — Vertical timeline with travel times between stops
- • Week View — 7-day layout with time slots
- • Month View — Traditional calendar grid
- • Year View — 12-month mini-calendar overview
- • Map View — Geocoded pins showing all inspections on a map
- • Previous / Next navigation and "Today" button
- • Inspector filter dropdown to show individual or all inspectors
Smart Scheduling
- • Route Optimization — AI reorders your day's stops to minimize drive time and distance, showing miles and minutes saved
- • Smart Slot Suggestions — When scheduling a new appointment, AI ranks available times by proximity to existing appointments (proximity score 0–100)
- • Travel Estimates — Day view shows distance and drive time between each stop
- • Duration Stats — See average, median, shortest, and longest inspection durations by property type
- • Batch Geocoding — One-click geocode all properties missing coordinates for accurate travel estimates
Appointment Status (Color-Coded)
- Blue — Scheduled
- Yellow — In Progress
- Green — Completed
- Gray — Cancelled
Creating Appointments
- • Click on a time slot or use "New Appointment"
- • Fields: Client name, email, phone, property address, date, start/end time, notes
- • Smart 30-minute time slots that respect business hours
- • Conflict detection prevents double-booking
- • End time auto-suggestion
Business Hours Integration
- • Calendar respects your configured business hours
- • Closed days are visually marked
- • Break times block off unavailable slots (e.g., lunch)
Embeddable Booking Widget
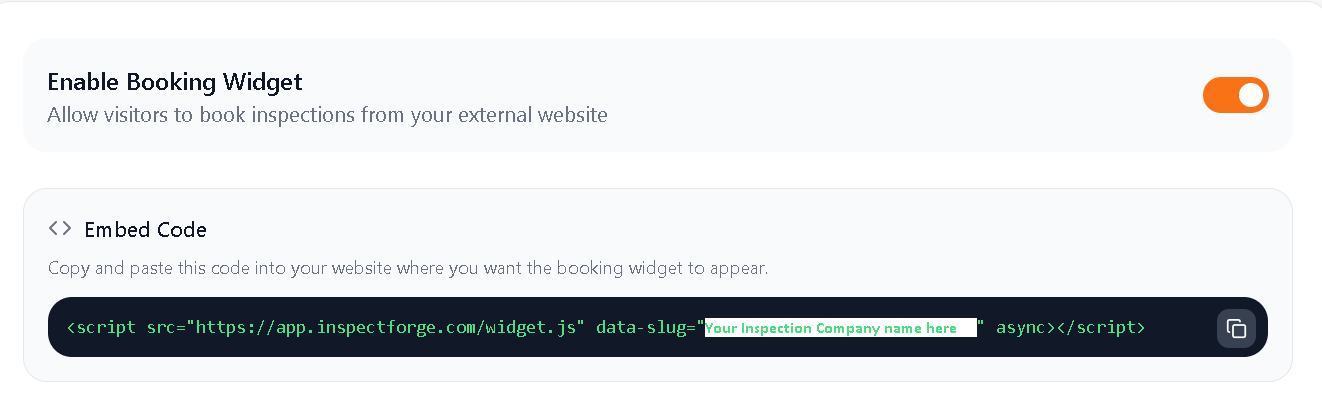
Add an online booking form to your existing website with a single line of code. Clients pick a service, choose an available time from your real calendar, and submit a booking request — no phone calls needed.
Included in all plans. Requires Inspector Website to be set up.
How It Works
- Go to My Website > Booking Widget tab
- Toggle "Enable Booking Widget" on
- Customize colors, scheduling rules, and which services appear
- Copy the one-line embed code
- Paste it into your Wix, WordPress, Squarespace, or any website
What Clients See
- Select from your list of inspection services
- Pick a date — only days you're available are shown
- Choose a time slot — pulled from your live InspectForge calendar
- Enter name, email, phone, and property address
- Submit — you get notified instantly in Booking Requests
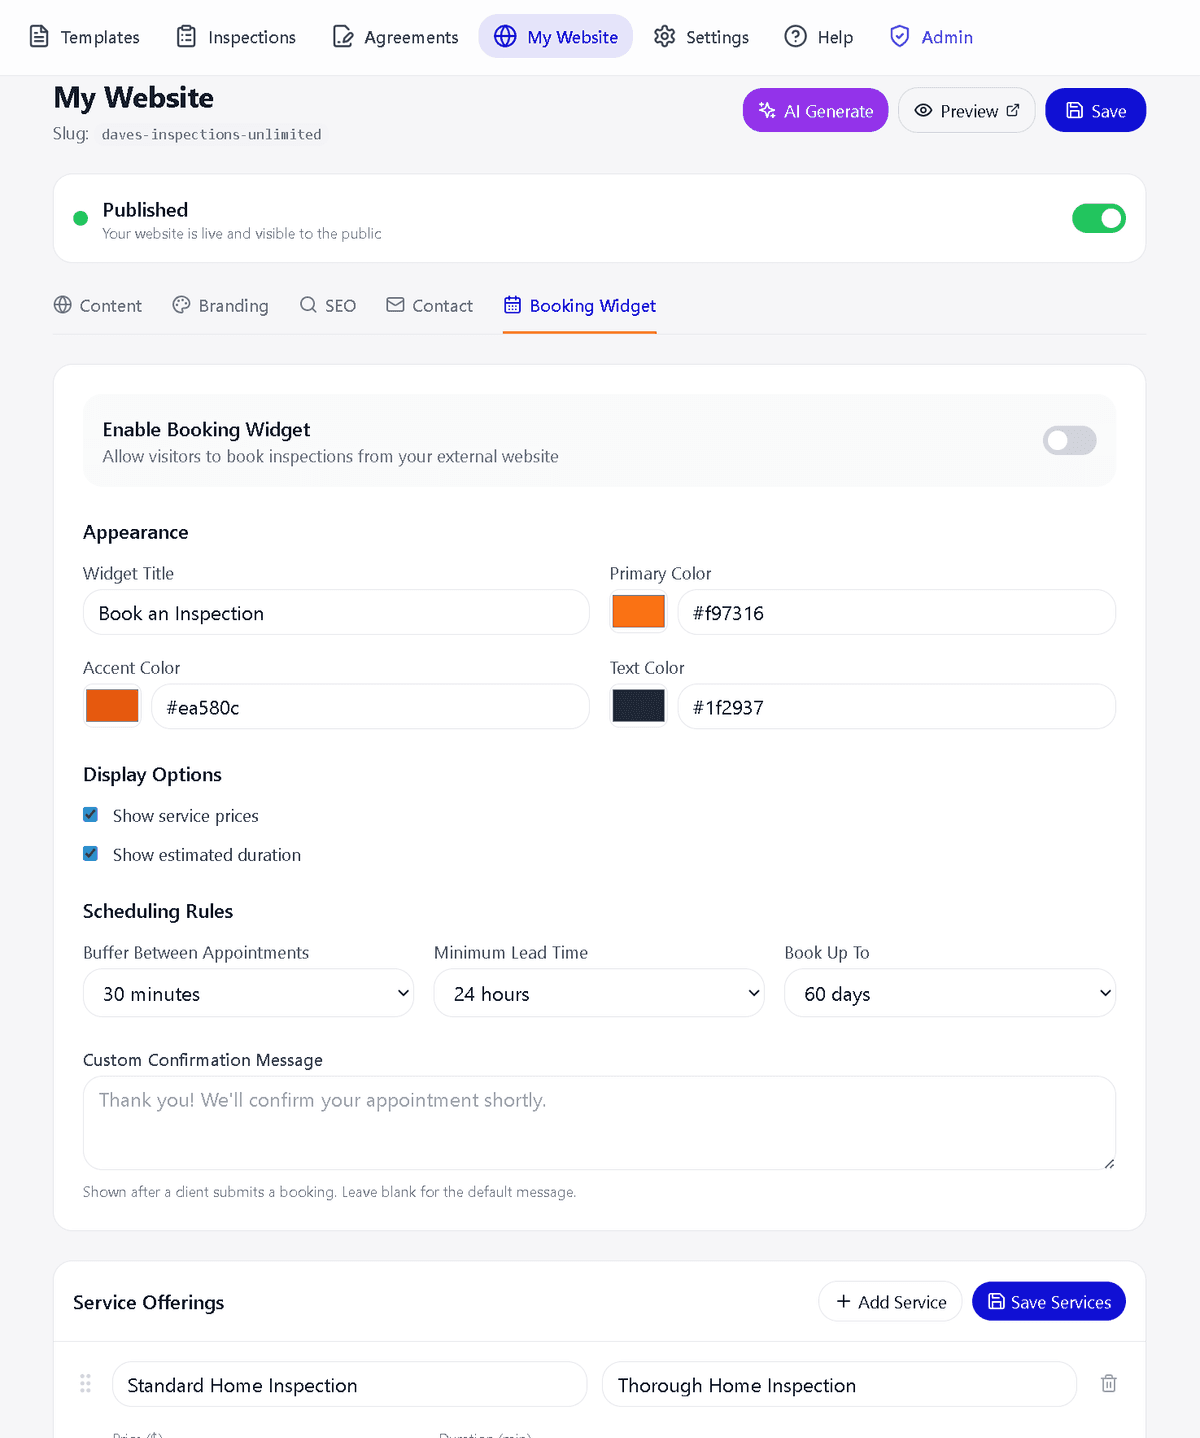
Scheduling Rules
- • Buffer Time — Minutes between appointments (15, 30, 45, 60, or 90 min)
- • Minimum Lead Time — How far in advance clients must book (12h, 24h, 48h, or 3 days)
- • Max Advance Days — How far out clients can book (2 weeks to 90 days)
- • Service Filtering — Choose which services appear in the widget
Customization
- • Brand Colors — Primary, accent, and text colors to match your site
- • Widget Title — Default "Book an Inspection" or your own text
- • Show/Hide Pricing — Toggle service prices and duration visibility
- • Confirmation Message — Custom thank-you text after booking
Client & Agent Portal
A branded, standalone portal where clients and real estate agents can view their inspection reports, findings, repair estimates, and documents — without downloading an app or creating an account.
Included on every plan — Starter, Pro, and Business.
Magic-Link Authentication
- • Client enters their email on the portal login page
- • A secure login link is emailed to them instantly
- • Click the link → authenticated → lands on dashboard
- • No passwords, no accounts — just email verification
- • Separate auth system from inspector login
Client Dashboard
- • Stats overview — Total inspections, completed, defects found, repair estimate range
- • Inspection cards — Each inspection shows property, status timeline, findings summary, documents
- • Status timeline — Visual stepper: Created → Scheduled → In Progress → Completed → Delivered
- • Repair estimates — Expandable priority breakdown with cost ranges
- • Quick links — View report, download agreement PDF
Portal Features
• Branded header with your company logo and name
• Multi-organization support (clients with multiple inspectors)
• Findings summary: defective, needs evaluation, with photos
• Inspector certifications display
• Property details: type, year built, square footage
• Payment status tracking
• Signed agreement access with timestamps
• Share report link with others
Settings
Settings is a card-based hub. From the main Settings page, tap a group card to drill into its sub-pages, and use the back arrow to return. Your profile card (name, email, and role) sits at the bottom of the page with an "Edit profile" shortcut.
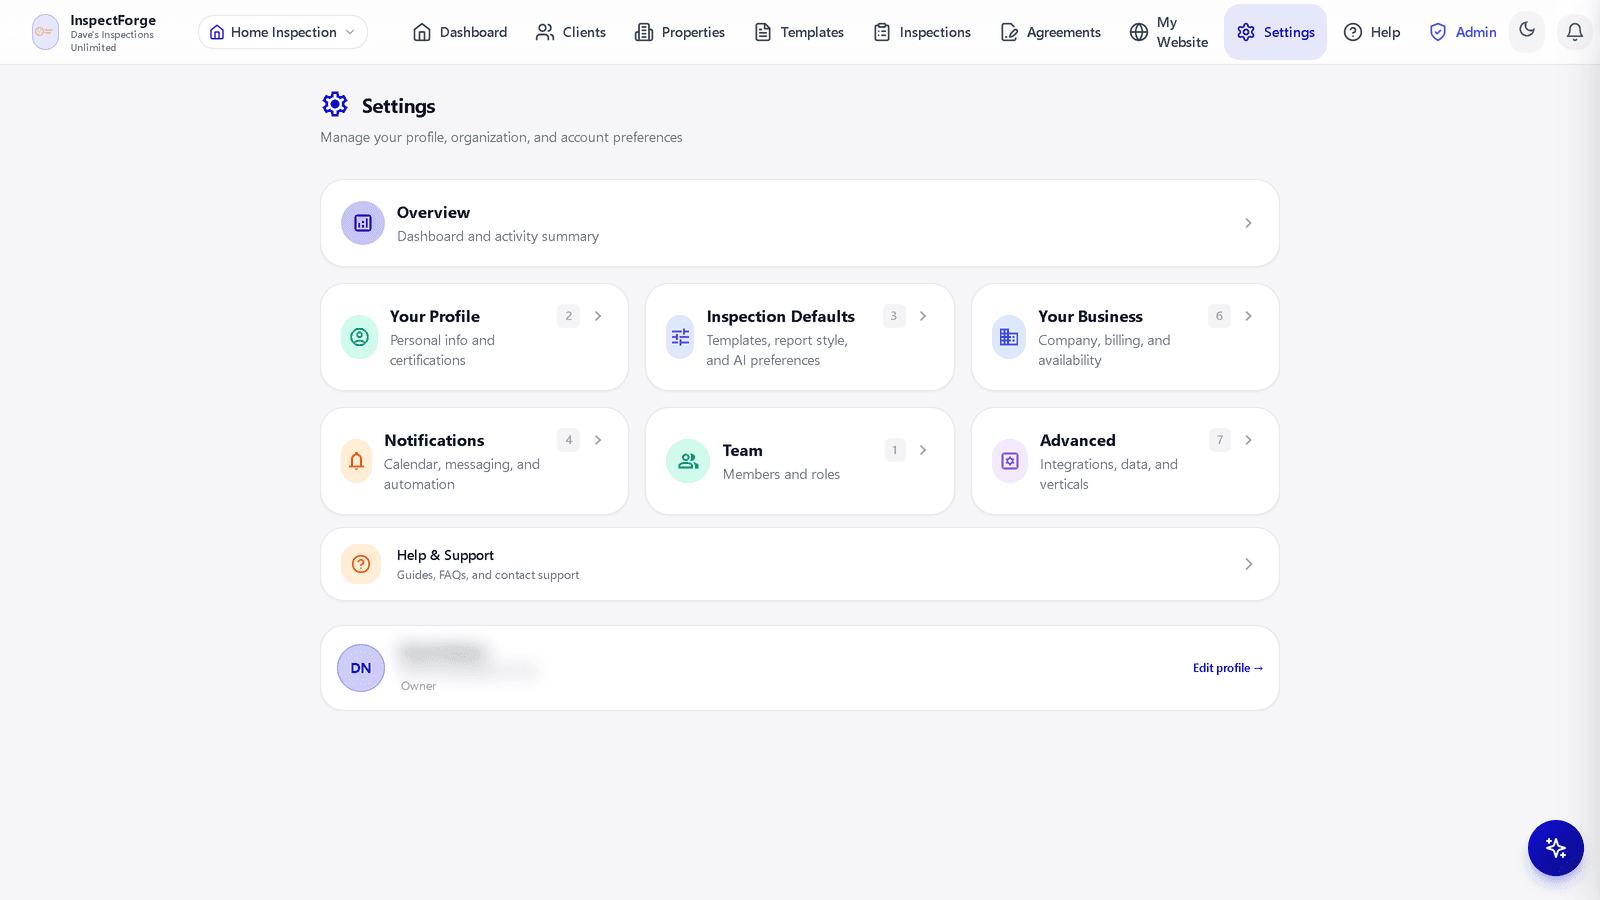
Settings Groups
Your Profile
My Profile (personal info) and Certifications (inspector credentials and licenses)
Inspection Defaults
Report Templates, AI Writing Style, and the Comment Library
Your Business
Company Info, Business Hours, Service Matching, Subscription, Payments, and Invoicing
Notifications
Calendar Sync, SMS Notifications, Email Templates, and Automations
Team
Users & Team — invite team members and manage roles
Advanced
Integrations & API, MailChimp, Verticals, Inspections Report, My Data, Google Drive Backup, and Import from Spectora
Company Info
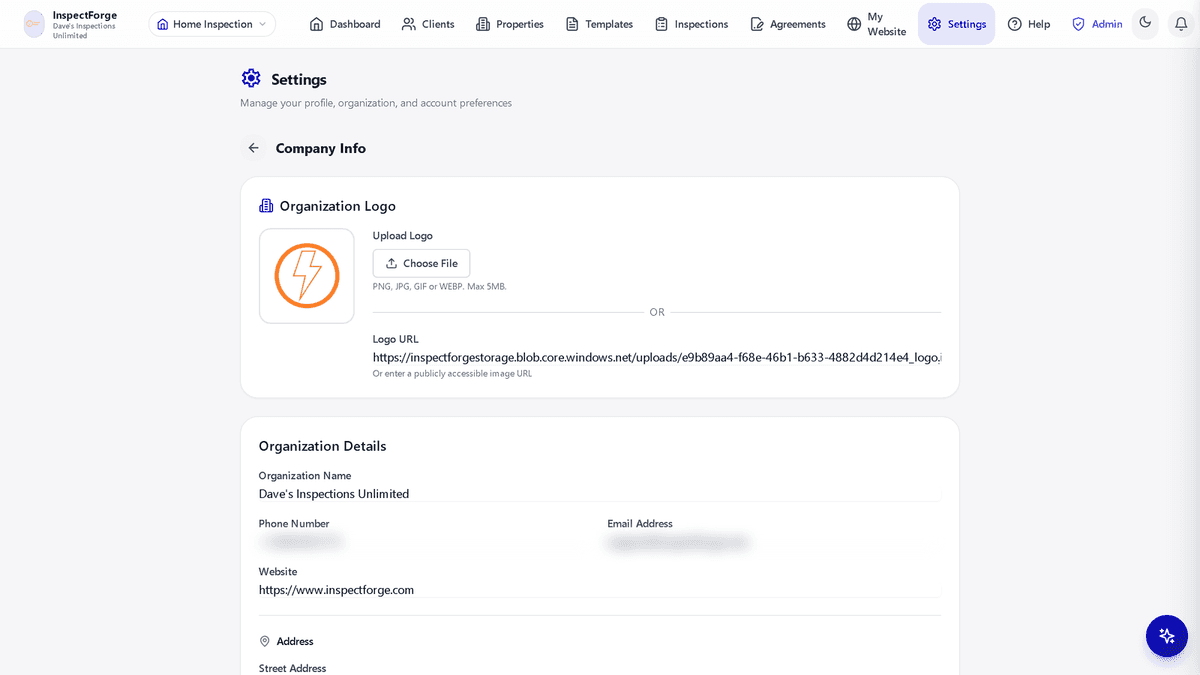
- • Logo upload (PNG, JPG, GIF, WEBP — max 5 MB) with live preview
- • Organization Name, Phone, Email, Website
- • Street Address, City, State, Zip Code
- • Logo appears on all generated reports
Business Hours
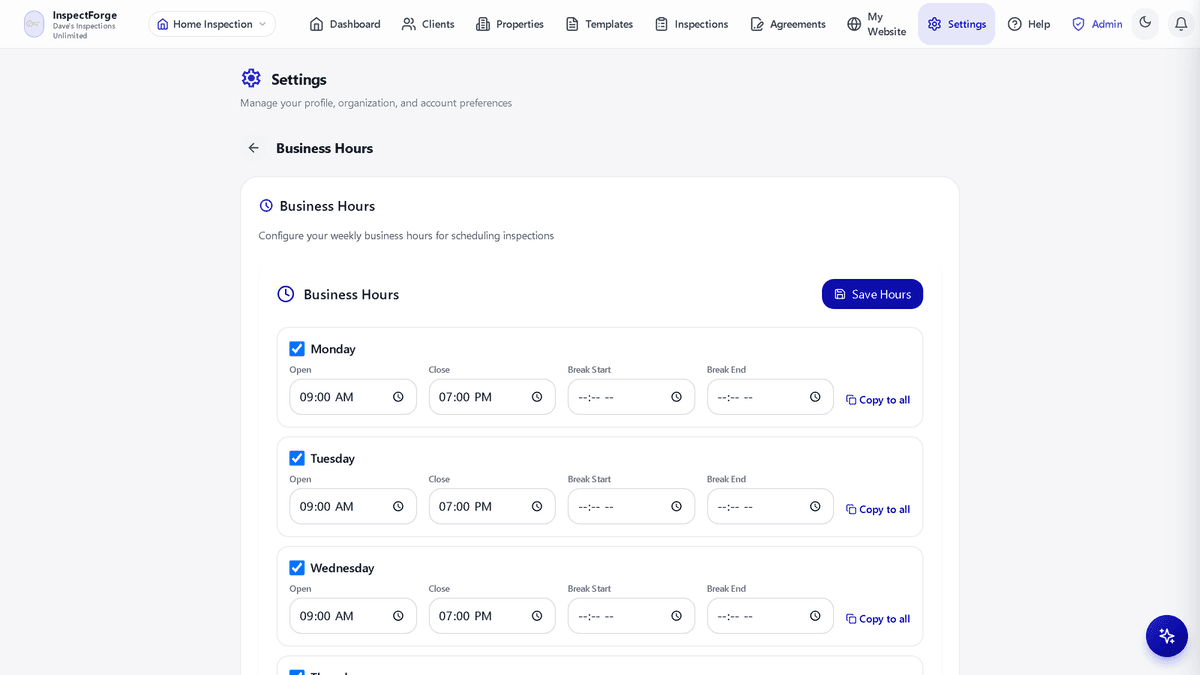
- • Per-day configuration (Mon–Sun): enable/disable, open & close time, break start & end
- • "Copy to All" button to replicate one day across the week
- • Saturday and Sunday default to "Closed"
- • Business hours determine when appointments can be scheduled
Users & Team — Adding Users to Your Organization
New team members join through invite links. You create the invitation, share the link, and the user sets up their own login — no passwords to hand out.
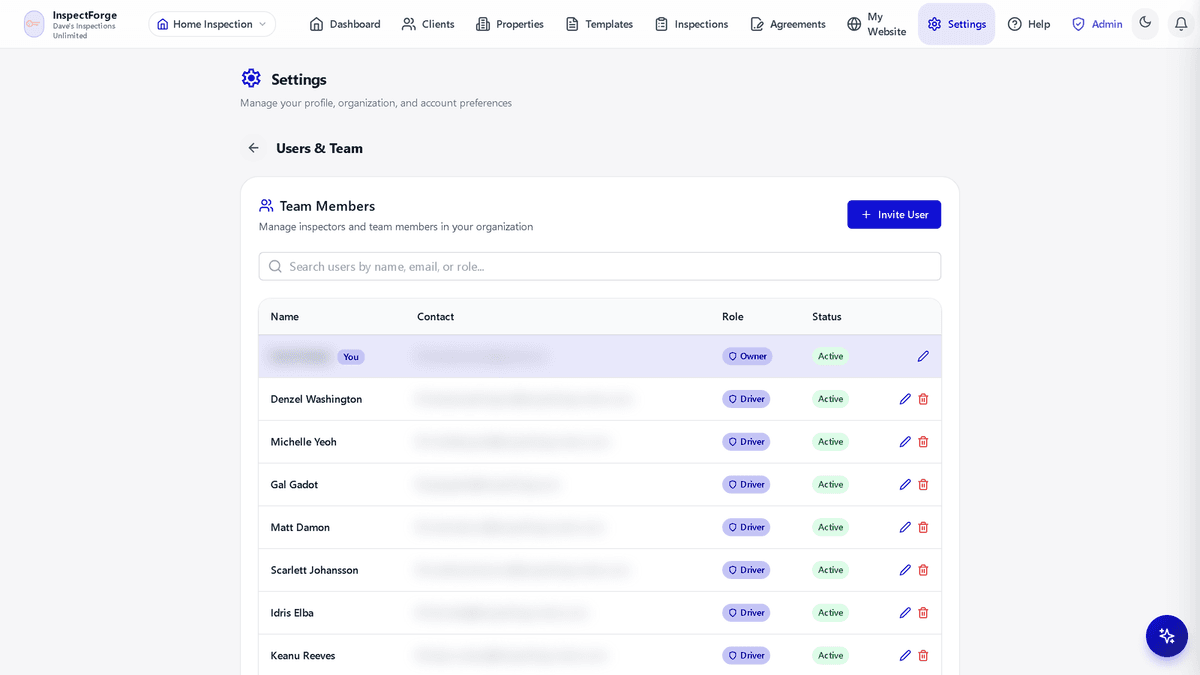
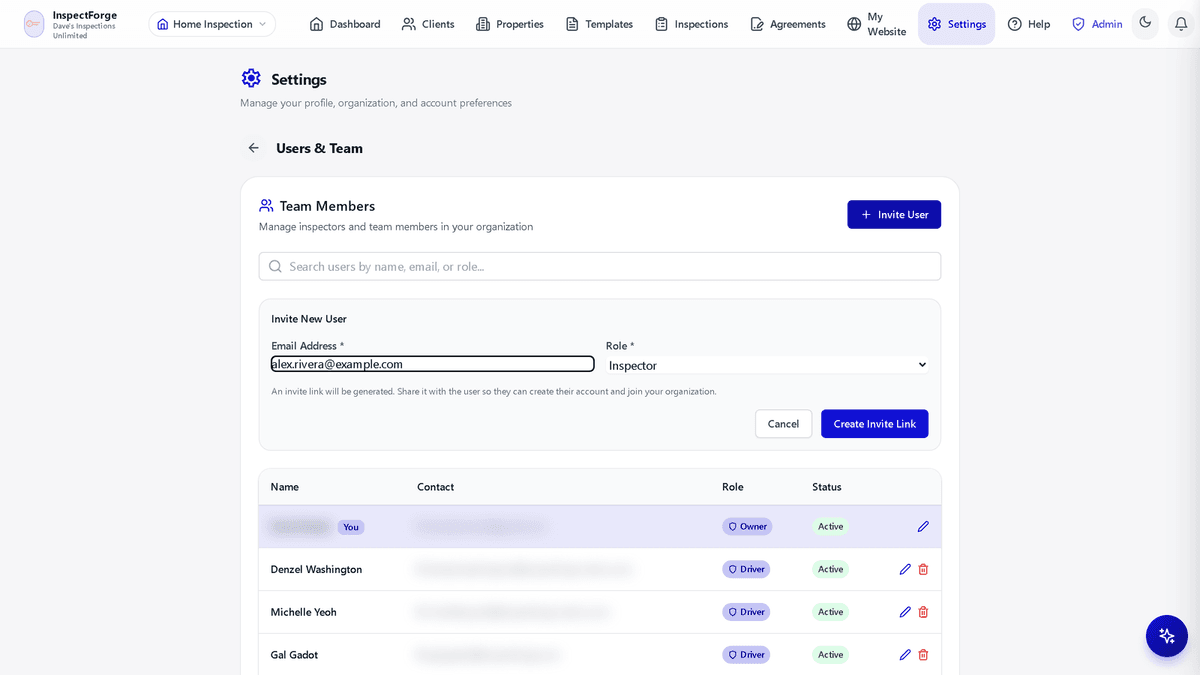
- Open Settings from the top navigation, then tap the Team card and select Users & Team
- Click "+ Invite User" in the top right of the Team Members panel
- Enter the new user's email address and choose a role: Inspector, Admin, or Driver (fleet)
- Click "Create Invite Link" — the invite link is generated and copied to your clipboard automatically
- Share the link with the new user (text, email, or chat). They open it, create their account, and land in your organization with the role you chose
- Until the invite is accepted, it appears under Pending Invitations with its expiration date — use Copy Link to re-share it or the trash icon to revoke it
- • The team table shows each member's Name, Contact, Role, and Status — search by name, email, or role
- • Edit a member's details or role with the pencil icon; remove members with the trash icon
- • Multi-Inspector Support: Starter = 1 inspector, Pro = up to 3, Business = up to 10
- • Each inspector gets their own login, can be assigned to inspections, and can be filtered on the calendar
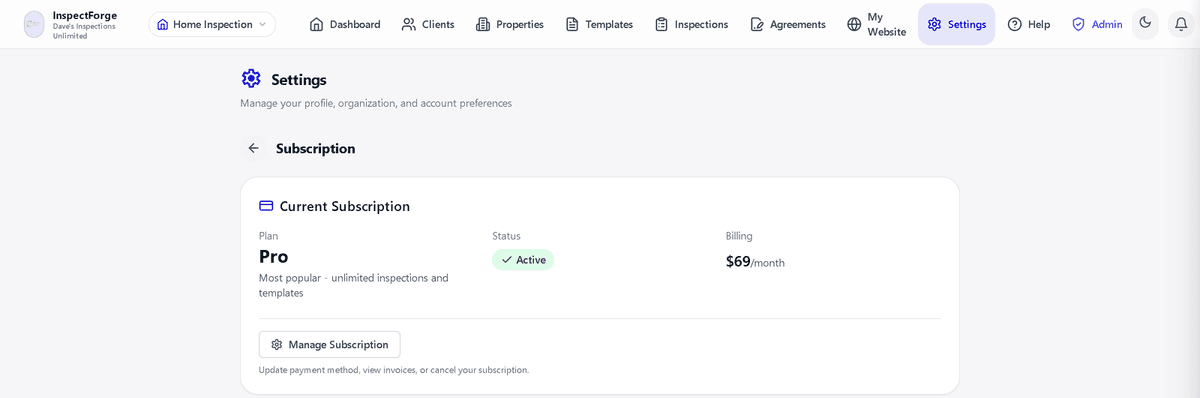
Subscription
- • Current plan card with name, status, billing amount, and description
- • Usage section: Inspections This Month, Storage Used, Max Inspectors, Templates, Scheduling status
- • Monthly / Yearly toggle with "Save 20%" badge
- • Upgrade or downgrade at any time — changes take effect immediately
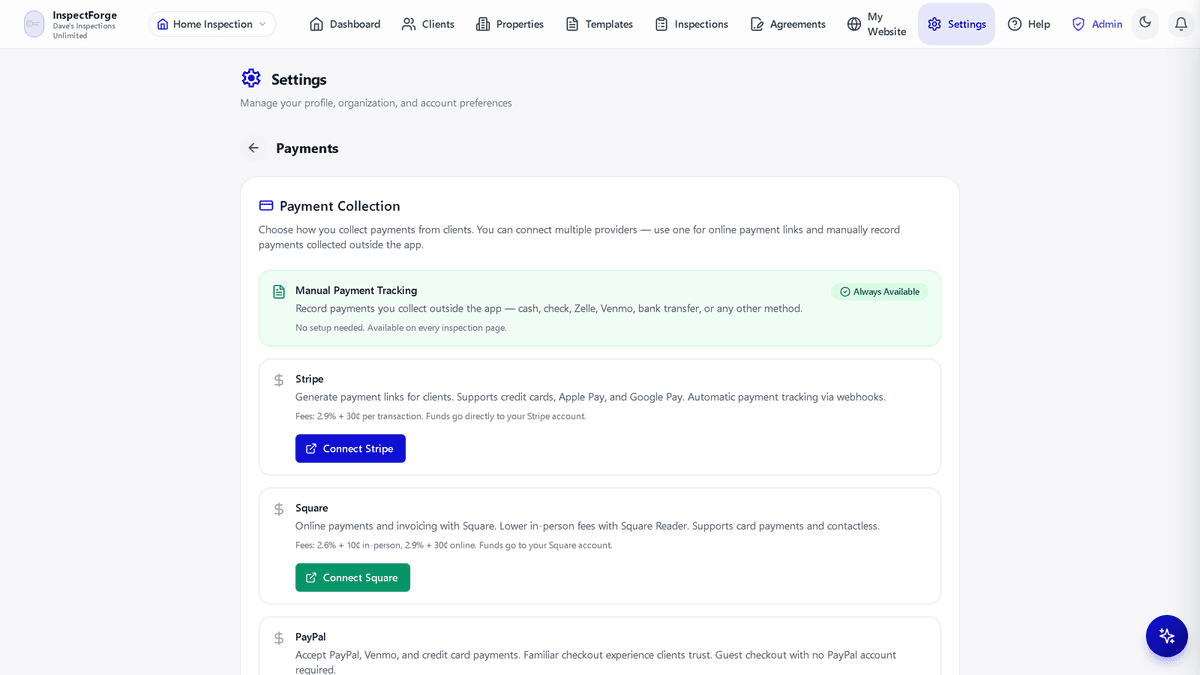
Payments
Choose how you collect payments from clients — connect multiple providers and mix online payment links with manual tracking.
- • Manual Payment Tracking — always available, no setup; record cash, check, Zelle, Venmo, or bank transfer payments on any inspection page
- • Stripe — payment links with credit cards, Apple Pay, and Google Pay; automatic tracking via webhooks (2.9% + 30¢ per transaction)
- • Square — online payments and invoicing, lower in-person fees with Square Reader (2.6% + 10¢ in-person, 2.9% + 30¢ online)
- • PayPal — accept PayPal, Venmo, and credit cards with guest checkout
- • Funds go directly to your own processor account — track payment status in real time and issue refunds from the inspection page
Google Integrations
InspectForge connects to Google Calendar and Google Drive. Both have completed Google's OAuth verification review, both are optional, and neither is switched on until you connect it yourself and grant consent on Google's own screen.
Google Calendar Sync
- • Connect from Settings → Notifications → Calendar Sync
- • Scheduled inspections appear as events on your Google Calendar
- • Rescheduling an inspection updates the same event rather than creating a second one
- • Your existing Google events are read too, so the booking widget never offers a slot when you are already busy
- • Syncs automatically every 5 minutes; Sync Now runs it immediately
- • An inspection must have an assigned inspector before it can sync
- • Disconnect revokes the authorisation with Google and stops syncing
Google Drive Backup
- • Connect from Settings → Advanced → Google Drive Backup (desktop only)
- • Report PDFs are written to an InspectForge Reports folder in your Drive
- • Files are organised into year-month subfolders
- • InspectForge can only see the files it creates there. It cannot read anything else in your Drive
- • Files already written stay in your Drive if you disconnect or cancel
- • Disconnect revokes the authorisation with Google
What we do with Google data
Data obtained through Google APIs is used only to provide the feature you turned on. It is never sold, never used for advertising, and never sent to an AI provider or used to train any model. You can withdraw access at any time from InspectForge or directly from your Google account permissions.
Full detail, including the exact scopes requested and the Limited Use disclosure, is in our privacy policy.
Subscription Plans & Billing
All plans include a 14-day free trial. No credit card required to start.
Save up to 23% with yearly billing.
| Feature | Starter | Pro | Business |
|---|---|---|---|
| Monthly Price | $39.99/mo | $69.99/mo | $99.99/mo |
| Yearly Price | $369.99/yr | $659.99/yr | $949/yr |
| Yearly Savings | ~21% | ~20% | ~20% |
| Inspectors | 1 | Up to 3 | Up to 10 |
| Inspections/Month | 50 | Unlimited | Unlimited |
| Custom Templates | 3 | Unlimited | Unlimited |
| Photo Storage | 2 GB | 20 GB | 200 GB |
| Digital Agreements | ✓ | ✓ | ✓ |
| Offline Mode | ✓ | ✓ | ✓ |
| Photo Annotation | ✓ | ✓ | ✓ |
| Client & Agent Portal | ✓ | ✓ | ✓ |
| Advanced Scheduling | — | ✓ | ✓ |
| AI Features (MI6) | All features (monthly caps) | All features — 500 photo analyses/mo, others unlimited | All features (unlimited) |
| Report Delivery Email | ✓ | ✓ | ✓ |
Payment Methods
- • Web & Android: Stripe (credit/debit card)
- • iOS: Apple In-App Purchase via RevenueCat (same plans and pricing)
Billing Management
- • View current plan and usage in Organization Settings → Subscription
- • Upgrade or downgrade at any time — changes take effect immediately
- • On iOS: Manage subscription through the App Store
Help Center & Interactive Tours
Get up to speed fast with searchable help articles and a guided interactive tour that walks you through every major feature.
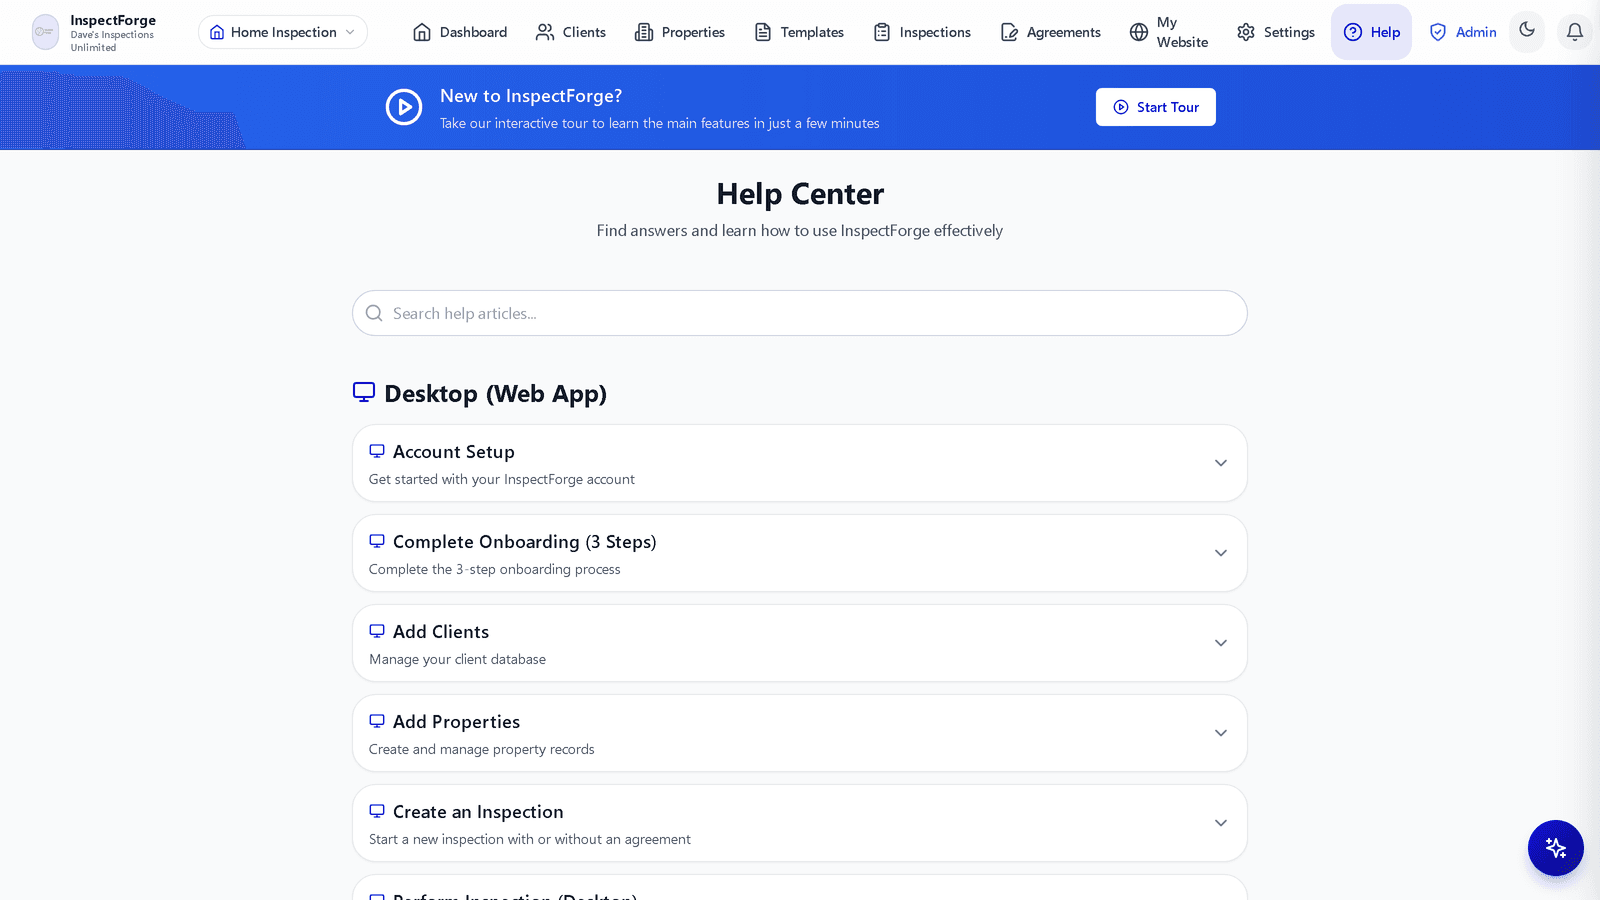
Interactive Tour
- • Banner at the top: "New to InspectForge? Take our interactive tour"
- • Guided step-by-step walkthrough of Dashboard, Navigation, Clients, Properties, Templates, Inspections, Agreements, Settings, and MI6
- • Progress indicators show how far along you are
- • Can be replayed at any time from the Help page
Help Articles
Searchable articles organized by platform:
Desktop (Web App):
Account Setup, Complete Onboarding, Add Clients, Add Properties, Create & Perform Inspections, Complete Inspection
Mobile (Field App):
Prepare Before Arrival, Navigate Inspection, Take & Annotate Photos, Use MI6 AI
Mobile Field App
InspectForge is available as a native mobile app on iOS and Android. The field app is built for on-site inspections with a touch-first design, offline mode, camera integration, and full AI capabilities — no laptop required.
Mobile App Visual Guide →
See every screen of the app, organized by workflow — a quick visual reference for inspectors in the field.
Home Screen & Bottom Navigation
Home Screen Quick Launch
- • Next inspection card — your scheduled job is front and center with a single "Start" tap
- • Quick Actions — New Inspection, Continue, View Reports
- • Recent activity feed — last inspections at a glance
- • Offline amber bar — amber banner appears when connectivity is lost; data syncs automatically on reconnect
4-Tab Bottom Navigation
- • Home — Quick Launch and recent activity
- • Jobs — Full inspection list and status
- • Schedule — Calendar and booking view
- • Settings — Account, templates, and preferences
QuickStart Inspection
- • Step 1: Choose an inspection template
- • Step 2: Select or create a property and client
- • Tap Start Inspection — you're in
- • Full inspection created in under 30 seconds
Item Rating Screen
- • Full-screen view for each inspection item
- • 4 giant stacked rating buttons — sized for gloves and field conditions
- • Comment bar — type or tap mic to record voice comments
- • Photo strip — tap + to capture or choose from gallery
- • Sections button opens a sheet to jump to any section
Photo Capture
- • "Take Photo" opens the native device camera
- • "Choose from Gallery" opens the photo library
- • Photos up to 10 MB supported, auto-save after upload
- • Tap the edit icon to open the annotation tool for drawings, arrows, circles, and text markup
MI6 AI on Mobile
- • Photo analysis — upload and tap "Analyze with MI6"
- • AI recommendations via the MI6 button
- • Chat bubble accessible in the bottom-right corner
Field Workflow
- Before Arrival: Open the app — your next scheduled inspection appears on the Home Screen. Review property details and agreement status.
- Start Inspection: Tap Start on the Home Screen card, or use QuickStart (2 steps: template → property/client). You're in the inspection in under 30 seconds.
- Document Each Item: Tap a rating button (Satisfactory, Needs Evaluation, Defective, or Not Inspected). Add a voice or typed comment, then capture photos via the photo strip.
- Navigate Sections: Tap Sections to open the section sheet and jump anywhere in the inspection. Use Previous/Next to step through items one by one.
- AI Assist: Use MI6 to analyze photos, generate recommendations, or ask questions.
- Auto-Save: Every change is saved automatically. If connectivity is lost, the amber offline bar appears — data syncs when you reconnect.
- Complete: After the last item, tap the green checkmark to complete the inspection.
- Back at Office: Review the report, let MI6 generate the executive summary, and deliver to the client.
Mobile-Specific Features
- • Offline-Ready Design — Data persists locally with amber status indicator; syncs when connectivity returns
- • Voice Comments — Tap the mic to speak findings instead of typing
- • Camera Integration — Direct device camera access with photo strip per item
- • Safe-Area Support — Adapts to notches and home indicators
- • Touch-Optimized — Giant buttons sized for gloved hands and field conditions
Supported Authentication
- • Email / Password
- • Google Sign-In
- • Microsoft Sign-In
- • Apple Sign In (iOS only)
Support & Resources
In-App Help Center
Searchable articles and platform-specific guides.
Interactive Tour
Guided walkthrough available anytime from the Help page.
MI6 Chat Assistant
Ask inspection questions directly in the app.
Email Support
Contact the InspectForge team for assistance.
App Workflow Diagrams
InspectForge follows a simple three-step flow: add your clients, set up their properties, then create and perform inspections. These diagrams show how each part works.
Managing Clients
Clients are the property owners or buyers who request inspections. Create a client first — they will be available when you set up inspections later.
Managing Properties
Properties are the physical addresses that get inspected. Link a property to a client, or leave it unassigned. You need at least one property to create an inspection.
The Inspection Lifecycle
Inspections are the heart of InspectForge. This flowchart shows the full journey from creating an inspection to delivering the final report to your client.
Putting It All Together
Here is how Clients, Properties, and Inspections relate to each other within your organization.
Quick Reference
| Step | What You Do | What Happens |
|---|---|---|
| 1 | Create a Client | Add their name, email, and phone to your organization |
| 2 | Create a Property | Add the address and details, link it to the client |
| 3 | Create an Inspection | Pick the client, property, and template — a report number is generated |
| 4 | Perform the Inspection | Walk through each item: rate it, add comments, take photos |
| 5 | Complete the Inspection | Mark it done, add a summary (or let AI write one) |
| 6 | Deliver the Report | Client gets an email with a link to view the full report |
Ready to Get Started?
Start your free 14-day trial today. No credit card required.
Comment Library
Build and manage a reusable library of professional inspection comments across all nine inspection categories. Access via Settings → Inspection Defaults → Comment Library, or open the navigation drawer on mobile.
System Library
Custom Entries
Suggestion Chips — On-Site Speed
Mine Past Inspections
The Mine Past Inspections tab searches all historical inspection comment text across your organization.
For full details and a feature walkthrough, see the Comment Library feature page.